The initial information on the technique of billiards presented to the reader is intended primarily for beginners and amateurs who want to independently master the basic technical and some tactical techniques. They are based on modern and generally accepted methodological recommendations of leading masters. Despite the wide variety of billiard games, the basic techniques outlined below are equally inherent in all types without exception. The presentation is based on the example of American pocket billiards (pool). This is explained not only by the desire to introduce amateurs to this particular technique and tactics, until recently known only from excerpts from American films, but also a type of pocket billiards that is becoming increasingly widespread in Russia and around the world. The fact is that there is extensive educational and methodological literature on the pool, practically unknown to the domestic reader. These methodological developments useful to use when mastering any billiard game, be it pool, snooker or Russian billiards. In addition, the author’s long-term observations of the play of leading masters of Russian billiards at the World and Russian championships as a judge of the All-Russian category are summarized.
In presenting this section, modern billiard terminology is used. If necessary, please refer to the section “The ABC of Modern Billiards”.
NOTE. For left-handed billiard players, all of the following recommendations should be understood in reverse.
1. PREPARATION FOR IMPACT
In any business, a system is important that provides for a very specific procedure. For example, a combat commander acts according to the following proven scheme: assesses the situation, makes a decision and gives an order. Having crossed cues with your opponent at the billiard table, you must also act in a certain sequence: firstly, you need to assess the position on the table, secondly, accept gaming solution and thirdly, prepare for the impact. Preparation for an aimed strike, in turn, involves: choosing an aiming point and the starting position of the cue, approaching the table and taking a stable playing stance, lightly gripping the cue and setting a reliable stop, correct aim and warm-up swing movements. It should be especially emphasized that for any, even the simplest blow, you should prepare equally carefully, acting each time according to the same scheme. We also remind you that before almost every shot it is advisable to chalk the cue sticker to avoid kicking.
1.1. Selecting an aiming point
Preparing for any strike begins with choosing an aiming point. Below we will clarify this concept, but for now
By this we mean the point on the playing surface where the cue ball should be directed. Indeed, without choosing an aiming point, you cannot take a playing stance, because the center of the cue ball and the aiming point determine the direction of the blow, and therefore the initial position of the cue.
1.2. Gaming stand
The playing stance must provide balance, stability and freedom of swinging movement. Bring the cue stick almost close to the cue ball and place three points in the same vertical plane - the chin, the cue ball and the aiming point. Turn to the right so that your right toe is located directly under the cue, and your left toe is slightly to the left of the cue line. In this case, a gap of 10 - 15 cm is formed between the cue and the body, providing freedom of movement. Distribute your body weight evenly between your right and left legs. Place the supporting hand of your left hand at a distance of 18 - 25 cm from the cue ball and lean forward. Hold the cue so that your right hand is located directly under your raised elbow. It is best when, when striking, the hand is 3 - 5 cm in front of the elbow, but in no case behind (see Fig. 1).
1.3. Grip
It was said above where to hold the cue. Now a few words about how to hold the cue. The cue should be held without tension using the thumb and the first three fingers of the right hand (see Fig. 2), while the cue should not touch the palm. It is important to maintain a light grip throughout the game. Squeezing the cue too hard when hitting the cue ball is a common mistake that not only affects accuracy, but also prevents

perform a number of fundamental technical techniques that involve transferring strong spin to the cue ball.
1.4. Wrist rest
A reliable WIST REST for the cue is extremely important for delivering an accurate shot. The positioning of the hand should be natural and at the same time give the cue a stable direction. There are two main stops - open and closed. When setting the OPEN STOP, the hand should be placed flat on the table, give it a slightly convex shape and press the thumb to the index finger, forming a V-shaped bend (see Fig. 3). This bend serves as a stop for the cue (see Fig. 4). To increase the height of the support, you need to pull your fingers towards you, and to decrease it, pull them forward. This way you can confidently hit the top, middle or bottom of the cue ball. On initial stage


mastering the technique of the game, when the main attention should be paid to accuracy and the ability to regulate the force of the blow, the beginner should select the height of the stop so that the blow hits the center of the cue ball, that is, so that the blow turns out to be CENTRAL. OPEN REST SIZE is defined as the distance between the cue ball and the thumb. As a rule, stops ranging in size from 18 to 25 cm are used. Experienced masters use an open stop when performing shots that do not require strong rotation of the cue ball. It is very important to use an open backstop when hitting distant balls, where you have to stretch out and place your backing hand more than 30 cm from the cue ball (see Fig. 5).
As the technique improves, it will be necessary to practice hitting other parts of the cue ball, located above, below, to the left, to the right, etc. It should be noted that with a strong DECENTRED IMPACT it becomes more difficult to maintain not only more

prolonged contact of the sticker with the cue ball, but also a STABLE DIRECTION OF ACCOMPANIMENT. In these cases, it is recommended to use a so-called closed stop. To set up the CLOSED REST, place the support hand flat on the table, firmly resting the bottom of your palm (see Fig. 6). Bend your index finger so that its end touches your thumb (see Fig. 7). Using the inside knuckles of your thumb and index finger as a guide, insert the cue into the closed loop they create. Now grab the cue firmly with your index finger, while the loop should be loose just enough so that you can easily swing the cue back and forth. After this, spread out and firmly place your middle finger, ring finger and little finger on the table. They form a tripod support, which should be strong and at the same time natural. With the stop placed correctly, the cue can easily be moved


moves, maintaining exactly the specified direction. To increase the height of the stop, raise the shackled fingers (see Fig. 8), and to decrease them, lower them so that the thumb is placed flat on the playing surface of the table (see Fig. 9). This emphasis provides more stable support. Moreover, the softer and smoother the shock-swing movement is, the higher or lower parts of the cue ball can be struck without fear of the cue sticker slipping along the surface of the cue ball (kick).
Let's now look at the STOPS ON THE HANDBAIL. If the cue ball is more than 10 cm from the board, place your support hand on the rail and place your thumb under your index finger (see Fig. 10). Move the cue close to your thumb and grasp it on the other side with your index finger (see Fig. 11). When performing a strike, keep the direction horizontal if possible.


cue. If the cue ball is less than 10 cm from the board, place the cue between your thumb and index finger. Place the remaining three fingers on the handrail, as shown in the picture. 12. If you need to hit the cue ball THROUGH THE BALL, proceed as follows. With all four fingers resting on the table surface behind the interfering object ball(s), raise your hand to the required height and place the cue on the rest formed by the thumb and index finger knuckle (see Figures 13 and 14). This is an inconvenient stop, but it is extremely necessary in practical play.
(If the cue ball is out of reach, use the MACHINE. Place the front of the machine on the table at a distance of 15 - 20 cm from the cue ball, and move the end to the side and hold it with your left hand. Place the cue in one of the cutouts. Grasp the horizontal bar from below with the large one, and on top with the rest four fingers of your right hand and move your elbow to the right, as shown in Fig. 15.)


1.5. Aim
Correct aim is the basis for an accurate strike. Below we will clarify the method for determining the aiming point. If the aiming point is determined, then all attention should be focused on accurately directing the cue to this point. Let's return to the gaming stand (see Fig. 1). During the aiming process, the gaze slides from the center of the cue ball to the aiming point and back, while the player adjusts the direction of the cue, trying to orient it exactly along the aiming line. If necessary, move the stop and/or body slightly. Once the cue is oriented and everything is ready to hit, your eyes should be focused on the aiming point.
1.6. Warm-up swing movements
When performing a strike, the hand, or rather, the part of the hand from the elbow to the wrist, makes a SHOCK-SWING MOVEMENT. Therefore, before performing any shot, you should make sure not only that the playing stance and sight are correct, but also that the cue can slide back and forth freely to the full size of the rest (18 - 25 cm). To do this, several warm-up swing movements are usually performed. This is a kind of rehearsal for the strike. It not only trains the hand to move the cue strictly in the direction of the aiming point. During rehearsal, the player mentally replays the blow, activates muscle memory and selects the required acceleration of the swing motion. The more difficult or stronger the blow, the longer the rehearsal should be. Typically, experienced players make from three to ten warm-up swing movements before hitting, depending on the degree of difficulty of the shot.
When performing warm-up movements, the gaze continuously monitors the correctness of the sight. It is also necessary to ensure that the swinging, pendulum-like movement strictly in the aiming plane is performed by only part of the arm from the elbow to the wrist. The elbow drops strictly vertically only during the SUPPORT stage (see below). This is the key to the accuracy of the strike.
1.7 Swing
When swinging, the hand is slowly retracted to the starting position. The stronger the blow, the further you should move your hand back. It is important to swing equally slowly, regardless of the force of the blow, and, after moving your hand away, take a short pause.
2. SHOCK-FLOW MOTION
From this moment, the cue begins to smoothly accelerate forward with a strike and transfer of movement to the cue ball. At the same time, the hand makes a movement that we will call SHOCK-SWING. Outwardly, it looks like a single movement, but essentially it consists of three components: ACCELERATION (ACceleration) of the cue, RECOIL DAMPING and CALL SUPPORT.
Thus, hitting the cue ball is the central, but not the only stage of the striking-swing movement. At the ACCELERATION stage, the hand imparts forward movement to the cue, accelerates it to the required speed, and gives it the necessary kinetic energy. At the DECREATION stage, the accelerated cue comes into contact with a stationary cue ball, and an impact occurs as such, that is, a collision and interaction of two bodies. At the same time, it is important to dampen, soften the impact and recoil, and prevent premature tearing of the cue ball from the sticker under the influence of peak impact forces. At this stage, the cue ball overcomes the inertia of rest and moves away. At the SUPPORT stage, which is the final and most important part of the shock-swing movement, the cue ball is accelerated to a given speed, giving it a given movement. This, strictly speaking, boils down to all the previous preparation for a strike and the strike-swing movement itself as a whole. It should be immediately emphasized that accompaniment is not pushing through, and certainly not moving after the cue ball. Unlike pushing, follow-up is an integral part of any correct striking-swing movement. It's all about proportionality here. According to international rules pool, it is the disproportion to the shock-swing movement that distinguishes a push (push) from a correct blow. Pushing, throwing, pushing - this is accompaniment without hitting. An unaccompanied strike, when the cue ball immediately breaks off the sticker, is a hard, undamped and, as a rule, inaccurate strike, or even a kick. (The only exception is a correctly executed JUMP in a pool, which is described in detail in the section “The ABC of Modern Billiards.”) Typically, normal accompaniment is 10-15 cm. Naturally, it must be proportioned to the specific position of the balls on the playing surface of the table. In this case, under no circumstances SHOULD YOU CONTINUE TRACKING UNTIL THE CALL COLLECTS THE OBJECT BALL. This can be classified as both a push and a double strike. In any case, this is against all the rules and is punishable by a foul (fine).
Thus, acceleration, damping and tracking are inextricably linked and are integral parts of the same shock-swing movement. And at each stage, one thing is important - smoothness, smoothness and smoothness. At the first stage, it is important to smoothly accelerate the cue strictly in the aiming plane. At the second stage, a smooth transition from the acceleration of the cue to the acceleration of the cue ball is important (we will also call the smoothness of such a transition the softness of the blow). And finally, at the third stage, smooth acceleration of the cue ball is necessary. This is what ensures the smoothness and integrity of the entire shock-swing movement and the smooth transmission of a given movement to the cue ball.
So, we have gained an understanding of the procedure for preparing for an impact and the impact-swing movement. Now you can start practicing it, or, as they say, setting up a strike. As an initial exercise, we can recommend hitting the cue ball from the front mark into the far corner pocket. You need to start, naturally, with a CENTRAL IMPACT or even a blow just above the center of the cue ball, using an open wrist rest. Prepare for the strike in full accordance with the sequence of actions described above. Pay special attention to the stability of the playing stance and support, light grip and relaxation of the wrist joint, and immobility of the elbow. Make sure that the cue is aimed exactly at the target and that the hand can move freely back and forth to the full width of the fence (18 - 25 cm). Then perform several smooth warm-up swing movements. Stop the cue at the cue ball and check the accuracy of the aim by glancing in a straight line from the cue to the aiming point. If the scope looks perfect, focus your gaze on the aiming point. Make a slow swing and, with the necessary acceleration, make a smooth shock-swing movement accompanied by the cue ball forward. In this case, the cue, having passed strictly above the front mark, should stop 10-15 cm in front of it, maintaining the direction along the aiming line. If after performing a strike the cue moves to the left or right, repeat the exercise again until you achieve the desired result.
It is very important to swing equally slowly, regardless of the force of the cue ball. In no case should you pull the cue back faster just because you need to hit harder. Here the situation is the same as when throwing a ball: in order to accurately hit the target, we slowly move our hand back and then make a strong throw forward.
At the next stage, you can practice a frontal blow to object ball, placing the object ball on a straight line connecting the cue ball and the center of the corner pocket. In this case, the aiming point is the center of the object ball. Practice hitting with different strengths, changing the distance between the balls.
3. CONCEPT OF CUTTING
The collision of the cue ball with the object ball occupies a special position in the technique of billiards. On the one hand, we give movement to the object ball. On the other hand, we change the speed and direction of the cue ball movement. This issue is quite complex, and we will consider only one side of it for now - giving movement to the object ball. We will assume that the balls are absolutely elastic and there is no friction between them. This is almost true. At least if the balls are aramite. Upon impact, the object ball begins to move under the influence of a shock impulse, which is directed from the point of impact to the center of the ball. This is the basis of CUTTING. Correct cutting is the basis of good MASONRY. However, cutting patterns must be known and taken into account when performing any shot, regardless of whether we pocket the ball or not. The ability to direct the object ball to a given point on the playing surface of the table is an important element of positional play. In addition, cutting largely

Rice. 39. Collision during cutting.
depends on the possibility of using certain technical and tactical techniques.
Let's look at fig. 39. Let's say that we need to give the object ball movement towards the center of the pocket (arrow a). Then impact force must be applied from the diametrically opposite side. In other words, the collision must occur at point A. We will call this point the COLLISION POINT. Determining the point of impact is not difficult. To do this, you need to approach the object ball from the side opposite the pocket and carefully look in the direction of arrow a. Then the point of impact will be facing directly at you. In order for a collision to occur at this point, the center of the cue ball at the moment of impact must be at point B. This is the AIMING POINT, that is, the place where the cue ball needs to be directed. THE POINT OF AIM IS HALF A BALL FROM THE POINT OF IMPACT. This is fundamentally important for performing an aimed strike. (In Russian billiard literature, following Lehman, the point of impact is called the “true aiming point.” In our opinion, this term should be abandoned, since the cue, with the correct aim, is directed not at the point of impact, but at the aiming point. The proposed terminology corresponds to the generally accepted world practice.) The straight line connecting the center of the cue ball to the aiming point is called the AIM LINE. It is along the aiming line that the cue should move when hitting correctly. And it is along the aiming line that the cue ball should be directed. Only then will the blow be accurate. Therefore, there is no need to prove how important the correct scope is. It should be added that once the aiming line is established and the eye glides along it, then any point on this line can be used as a reference point for the sight, sometimes even a point on the handrail or playing surface of the table. (In some cases, it is useful to estimate which point on the surface of the cue ball will come into contact with the object ball. How to do this can be seen from the figure. The desired point is indicated by the letter C. The direction of the straight line SA coincides with the direction of the aiming line.)
We will call the angle between the direction of aiming and the given direction of movement of the object ball the CUTTING ANGLE. As the aiming line moves away from the center of the object ball, it changes from 0 to 90 degrees. In a FRONTAL IMPACT, when the aiming point coincides with the center of the object ball, the cutting angle is zero. The object ball receives movement in the direction of the original movement of the cue ball. In a head-on collision, almost all the energy of the forward motion of the cue ball is transferred to the object ball. In contrast, when playing a shot at the LIMIT CUT, when the cue ball barely touches the object ball, the cut angle is close to 90 degrees. In this case, the object ball receives an extremely small forward momentum, while the cue ball practically retains its kinetic energy.
The remaining cases occupy an intermediate position. Of particular interest is HALF-BALL CUTTING, when the aiming point is shifted half a ball away from the center, while the natural reference point for aiming is the edge of the object ball. The cutting angle in this case is exactly 30 degrees. That's probably all you need to know about cutting. The rest comes with experience. Practice hitting shots at a variety of cutting angles and gradually increasing the distance between the balls. Over time, you will learn to accurately determine the point of impact and the point of aim literally at first glance, just as the masters do.
4. CUE BALL MANAGEMENT BASICS
A central strike on the cue ball is, in principle, quite enough to master placing an object ball. And if the reader opened the book only to learn how to guide the object ball into the pocket, then, having familiarized himself with the concept of cutting, he can immediately begin to play. Indeed, for many billiards lovers it is a laying of balls and nothing more. They don’t even suspect that, in principle, a cue ball can and should be controlled, that where it stops can be controlled. Concentrating all their efforts on placing the object ball, every time in case of a miss they beg the cue ball to hide behind the balls, stop at the short side, roll a little further, etc., as if they were not the ones who set it in motion. No matter how important the strength and accuracy of a strike is, for a serious game this, alas, is not enough. The masonry becomes a formidable weapon only in combination with the technique of control and management of the cue ball. This is necessary not only and not so much for pocketing the cue ball in Russian billiards, but for playing positional play - the basics of pocket billiards, be it Russian billiards, pool or snooker. The game of a person who has learned the intricacies of control and management of the cue ball with an inexperienced amateur is the same as a duel between a karate master and a street bully who has learned only one blow - with a swing to the jaw. However, it's not just about the result. If you master the technique of control and management, the extraordinary beauty and truly unlimited possibilities of positional play, its deep intellectual aspects, will be revealed to you. The game becomes more interesting and meaningful. You will be able to show all your imagination and abilities. Isn't this worth the effort?
There is little difference between control and management. However, let us clarify that by CONTROL we will understand a set of technical techniques that allow us to change the trajectory, direction and nature of the cue ball’s movement before or after impact with the object ball or board. And under CONTROL - the ability to stop the cue ball at a given point on the playing surface of the table. Both are equally important.
4.1. Roll up, stop and pull back
ROLL, STOP and PULL - these are the three pillars on which the entire cue ball control technique rests. And a beginner must first of all master these technical techniques. It is clear that the roll will happen if the cue ball retains its top rotation after a FRONTAL collision; stop - if the cue ball does not acquire the top rotation at the moment of impact or loses the bottom rotation given to it due to friction on the cloth; and, finally, a draw - if the cue ball maintains sufficient downward rotation after impact. When performing a roll, the blow is usually struck at the upper half of the cue ball, and the higher the blow is struck, the stronger the top rotation the cue ball receives. When performing a backdrop, on the contrary, the lower the blow is struck, the stronger the downward rotation is imparted to the cue ball.
Let's immediately stipulate that bottom spin and PUSH are far from the same thing, although in billiard literature these concepts are hopelessly confused. Bottom twist of the cue ball is a mandatory, but not the only condition for performing a quickdraw. On the other hand, the bottom twist is used not only for quickdraw. It is used, for example, when performing a stop. The author has repeatedly observed how beginners, either on a whim or after reading something about “klapstoss,” try to stop the cue ball with a short and hard central blow, stopping the cue immediately after the sticker touches the cue ball or even moving it back. Of course, nothing will come of this. In order to stop the cue ball, it must be given sufficient downward rotation. Then, due to friction on the cloth, he will lose it when approaching the object ball. The difference in the technique of stopping and pulling is in “how much” of the spin can be “conveyed” to the object ball.
To impart downward rotation to the cue ball, a fairly fast and soft “clipping” movement with wrist accompaniment is required. But that's half the battle. If all your efforts are concentrated only on adding twist, then the PUSH will not work. The underspin will not be able to reach the object ball. It will be “eaten up” very quickly by friction on the cloth. The main condition for performing a quickdraw is that, IN ADDITION TO A STRONG UNDER ROTATION, THE CALL SHOULD BE GIVEN A STRONG SLIDING FORWARD MOTION. The concepts of SLIDING and SLIDING IMPACT are described in detail in the section “The ABC of Modern Billiards”. It remains to add that only with a strong glancing blow can you quickly “bring” the bottom rotation to the object ball.
How can one practically ensure a combination of a strong underspin with a strong sliding forward movement? First, you need to find the optimal impact point. Here the situation is this: the closer to the center, the more sliding, but the less twist, and vice versa. There are no uniform recommendations here and cannot be. It all depends on the distance to the object ball and how far we want to pull the cue ball. Approximate application point

Rice. 40. Approximate point of impact when performing a quickdraw.
shown in Fig. 40. It is spaced from the center by approximately half the radius of the ball. Secondly, you need to deliver a strong but soft blow with a stable cue ball accompaniment. When performing a stop and draw, it should be borne in mind that the further the cue ball is from the object ball, the lower and (or) stronger the blow should be struck. To achieve the maximum effect, the striking-swinging movement must ensure that the cue ball is accompanied forward by 10 - 15 cm. (We remind you that we are talking about strikes with a horizontally oriented cue. Strikes with a raised cue are strikes of the MASS category, and we have a special conversation about them.)
We offer several simple training exercises for practicing rolling up, stopping and pulling back. First, an exercise to practice ROLLING UP. Arrange the balls as shown in Fig. 41. Lightly hit the cue ball half a radius above the center so that after impact it stops in position 1. Repeat the hit with a little more force so that the cue ball stops in position 2. Now hit even harder
Rice. 41. Practicing coasting
and get the cue ball to stop in position 3.
The next exercise is for practicing STOP. Arrange the balls as shown in Fig. 42, starting at position 1. Hit the cue ball below center approximately one sticker diameter. You need to

Rice. 42. Practicing stopping.
raise the swing motion equally smoothly and strive to ensure that the cue ball stops immediately after contact with the object ball. Do this a few times to get a feel for how hard to hit. Then hit the cue ball a little lower and with a little less force, trying to get the same result. After this, move on to position 2. This time hit the cue ball below the center half a radius and a little harder than in position 1. By repeating the exercise several times in the new position, you will soon get a feel for how hard to hit. Continue training using starting positions 3 and 4 for the cue ball and increasing the impact force each time. If you have difficulty in a particular position, repeat the exercise until you achieve the desired result. Remember: the lower the cue ball is hit, the less force is required to stop the cue ball once it hits the object ball.
Let's now practice doing the PULLOUT. Arrange the balls as shown in Fig. 43. First hit the cue ball with moderate force half a radius below the center so that the cue ball rolls back to position 1. As you increase the force of the hit, make the cue ball roll back further, stopping at positions 2 and 3. When performing these exercises, pay attention special attention should be paid to ensuring that the cue accompanies the cue ball forward by 10 - 15 cm. Both when stopping and when drawing, the cue ball is struck approximately half a radius below the center. If the striking-swinging movement of the hand is well practiced, strike the cue ball, slightly tilting the cue forward so that, having advanced 10 - 15 cm, it stops, almost touching the cloth.

Rice. 43. Practicing the quickdraw.
4.2. Outset
Let's talk now about the SIDE. It is also one of the main technical techniques for controlling and controlling the cue ball and is used when performing a variety of exits, winbacks, shots from the board, as well as when playing the cue ball into a pocket in the “Moscow Pyramid” and “American”. A side kick is a decentered shot with a side spin of the cue ball. It is used primarily for the purpose of expanding or narrowing the angles of reflection of the cue ball from the board. To widen the corners, use a side panel with a RUNNING SCREW, and to narrow the corners, use a side panel with a REVERSE SCREW. You should always remember that the side in a pool, as a rule, is used not to pocket the object ball, but to get under the next ball. Although the role of the side kick when playing with exits is extremely large, experience shows: the less often you use the side move, the fewer misses in the pocket. The fact is that sideways entails side effects, capable of changing the direction of the cue ball's movement. They manifest themselves especially strongly when striking with an inclined cue. This is the so-called mass effect (see section “The ABCs of modern billiards”). However, even when striking with a horizontally oriented cue, there is a slight deviation of the cue ball’s trajectory from the aiming line due to the impact impulse towards the center of the cue ball. In other words, the right side moves the cue ball a little to the left, and the left side moves the cue ball a little to the right. Therefore, when performing a right side shot, the aiming point should be shifted slightly to the right, and when performing a left side shot, a little to the left.
It should be emphasized that at the initial stage of mastering the technique, one should not get carried away with hitting areas of the cue ball remote from the center. The fact is that with a decentralized side impact, maintaining stable contact between the cue stick and the cue ball is much more difficult. Moreover, the harder and farther from the center the blow is struck, the more difficult it is. We have already said that the sticker must be chalked with special billiard chalk. Let us only add that when spinning the cue ball, you need to chalk especially carefully. Otherwise, instead of twisting, you may end up with a kick. In addition, the correct hemispherical shape of the sticker is important, ensuring the “hinge” of the contact.
Now about the softness of the blow and the smoothness of the accompaniment. It was already said above that good shock absorption and smooth tracking allows you to maintain contact between the sticker and the cue ball. It remains to add that when spinning the cue ball, these factors are doubly important. Moreover, relaxation of the wrist joint and wrist support play a special role. Why carpal? Each of us has spun a bicycle wheel at least once in our lives. Everyone knows that the impulse must be applied not to the center, but away from it (that is, decentered). Try, however, to spin the wheel strongly with a fist blow - nothing will happen. If you connect a brush and repeat approximately the same movement, the effect will be completely different. When spinning the cue ball, approximately the same thing happens.
Like any other technical technique, the side kick should first be practiced in training. In Fig. Figure 44 shows examples of changes in reflection angles depending on the direction of side twist when performing

Rice. 44. Rolling with a running and reverse propeller.
NAKATA. Try to see this for yourself. There are countless options for the relative position of the balls. Practice shots of varying strengths with the RUNNING and BACK SCREW, while trying to CONTROL THE CUE. Over time, you can move on to performing a side kick in combination with a PUSH.
5. ELEMENTS OF POSITIONAL PLAY
Having mastered the basic technical techniques - rolling, stopping, pulling and side kicking, you can move on to mastering the basic techniques of POSITIONAL PLAY. Without pretending to fully cover all aspects of positional struggle, many of which are explained above in “The ABC of Modern Billiards,” we will focus primarily on the ability to make an EXIT. This is an element of active positional play. It plays an important role in any pocket game, but is especially important in pool and snooker, since these games are based on the ability to pocket not just one ball, but a SERIES of balls. If, for example, when playing “Russian Pyramid” or “Moscow Pyramid” a series of three or more balls is quite rare, then in pool and snooker, other things being equal, success accompanies the player who knows how to build a series and bring the game to victory.
The basis of the exit is CONTROL OF THE CUE. The point of OUT is to, after playing one simple object ball, place the cue ball in a place on the playing surface from where you can easily play another object ball. The easiest way to learn how to make an exit is by practicing a specific blow in training. In this case, the position of the object ball and cue ball should be marked on the felt with chalk, so that you can start from the same starting position each time. Arrange the balls as shown in Fig. 45. Pocket the object ball, hitting the cue ball just above the center, and watch where it hits the first edge and in what direction it bounces off it. If you hit the cue ball in the same place, but with different forces, then you can notice that the trajectory of its movement remains almost unchanged, only the path it travels changes (SIZE OF THE IMPACT). By adjusting the force of the blow, make exits for each of the object balls shown in the diagram.
If you now strike the cue ball from the same starting position just below the center, then the trajectory of its movement will change significantly. By adjusting the force of the blow, ensure that the cue ball, moving along the same trajectory, moves further and further along the table. Continue practicing, hitting the cue ball even lower. This will give you a basic idea of what will happen when you hit the cue ball at different points and with different forces.
The following exercise demonstrates how the trajectory will change when hitting the cue ball at points at different heights. Arrange the balls according to Fig. 46. If you perform a ROLL, the cue ball will describe the curve shown in the figure. If you apply a gesture

Rice 45 Exit processing

Rice. 46. Changing the trajectory of the cue ball.
cue FLAT just below center, the cue ball will go straight to the short side. If you hit the cue ball half a radius below the center, it will be pulled closer to the corner pocket.
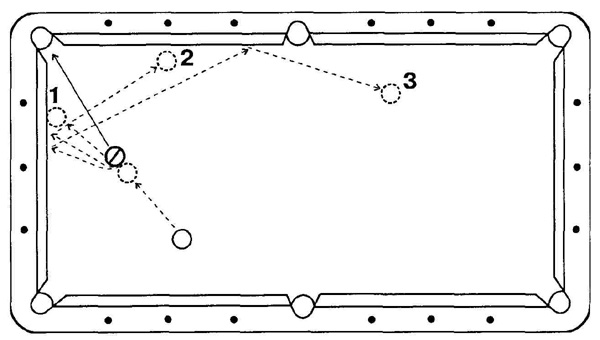
Successful exit play is based on good POSITIONAL THINKING, which involves quickly finding the simplest paths to build a series. To develop positional thinking skills, it is recommended to perform an exercise that can be called “Three from the hand.” Throw three balls on the table. Let us assume that they are located as in Fig. 47. The balls are numbered in the order in which they are easiest to pocket. If you hit the cue ball above the center, then, having placed ball No. 1, due to the roll, it will hit the side and be reflected in the direction of ball No. 2. Depending on the force of the hit, the cue ball will stop in one of the positions shown in the diagram. It's very difficult to miss here. If you hit the cue ball again above the center, the cue ball, having placed ball No. 2, will stop inside the shaded sector. After this, it is easy to place ball No. 3.

Rice. 47. Three from hand.
Repeated repetition of the same blows - best way teaching the game. Don't get carried away with complex shots across the table. It is worth practicing only simple and medium-difficult strikes, when performing which they often make mistakes. An error in this case should be understood not just as a miss in the pocket, but as an unsuccessful exit to the next ball. Therefore, during training, you should repeat the shot even if the object ball is played, but the exit did not work out. Practice the exit until you can confidently achieve the desired result. Many people believe that success in the game comes from the ability to execute difficult shots. Practice, however, shows that it is not those who perform complex strikes who win, but rather, on the contrary, those who cannot make the correct exit when performing simple strikes lose.
As a good training exercise for both beginners and stronger players, we can recommend games of Eight and Nine with modified rules. If a ball falls from breaking, then you can start your series PLAYING FROM HAND. After a miss on the pocket, the opponent begins his series also with his hand. The advantage of this game is that playing from your hand begins with examining the table. Even a beginner will see the opportunity to score two or even three balls. A more experienced player very quickly finds the most rational way to pot all the balls in sequence. This training game teaches you to quickly make standard game decisions and choose the easiest way to organize a series. An hour of playing "Eight" or "Nine" from your hand provides the same amount of training as fifteen hours of regular gaming practice.
It should be emphasized that technique and tactics cannot be considered in isolation from each other. The wider the arsenal of technical techniques, the more opportunities for positional play. Quite simple solutions were discussed above. As you improve your playing technique, you can move on to more complex and sophisticated outputs. However, everything has its time. You shouldn't rush things. Only after mastering the basic techniques can you move on to learning more complex ones, and it is important to correctly assess the level of your playing. A beginner can be given simple advice: IT IS NOT AS IMPORTANT TO KNOW HOW WELL YOU PLAY AS TO KNOW HOW BAD YOU PLAY. I had the opportunity to communicate quite closely with many famous masters. And all of them, as a rule, are not satisfied with their game. This is quite understandable. As you improve your skills and gain experience, your ideas about what is good and what is bad change radically. Even those virtuosos who regularly finish their games with a cue complain about poor play. Watch the play of recognized masters at official competitions, and then you will understand what modern high-level pocket billiards is.
To view a product description and its technical characteristics, you need to click on the selected photo or product name
The first stage in learning to play billiards is setting the shot itself, training the accuracy of the sight, and practicing hand movements. The technical practice of the strike is quite easy, but you should immediately learn how to perform it correctly. Most beginners ignore this, setting themselves the wrong goal right away. Your task is not to drive the ball into the pocket. The task is to comprehend the blow, performing it in such a way that the two balls, bypassing the collision, arrive at the place where you wish. It is advisable to work on fundamental skills using regular swings “head-on”: knocking out the cue ball at the center point of the ball. When your technical skill is already at a relatively acceptable level, it is time to learn more about different types blows, and begin to improve them. The type of hit on the cue ball is determined by the direction of displacement of the point of impact from the center of the ball. There are 9 similar directions and each of them serves as the name of a particular blow.
Types of cue strikes on the cue ball
You can touch the cue ball area with a billiard cue in any way. The easiest way to decide on different directions is to use the pattern of shots in billiards. So, the types of strikes:
- Klapstoss - hitting the center zone of the target. The starting blow from which the polishing of billiard technique begins. The remaining beats moving away from the center point are called “effe”. One of the main ones, which makes it possible to “place” the ball reliably. When beating clearly at its central point in the plane, opposite the billiard surface, the cue ball makes only a rhythmic forward movement and, having come into contact with the “foreign” ball, remains in place. The ball that in the game will bounce in a given direction.
- Roll up - runout above the center mark of the ball. Often there is a need for “one’s” ball to come forward without colliding with the “alien” one. For this purpose, a slow, elongated blow is applied to the upper area of the cue ball. Here the cue ball, in addition to being pushed away from the player, will catch the oscillatory movement and, after colliding with the ball being played, pause for a second and move forward. By the way, it’s perfect for debutants, it’s easy to do, and the aim is quite accurate when hitting a given shot.
- Guy - runout below the center point of the ball. It differs from rolling up in greater complexity, since the ball must be given the opposite horizontal torsion. When the need arises to move “your” ball back, the blow is directed to the lower area of the cue ball. Here, in contrast to the rolling strike, along with the slow forward movement, the cue ball will be rewarded with a spin around the horizontal axis to the opposite side and, staying in place, bypassing the strike, will roll back.
Cue shots in billiards are famous for the backdrop, because it is the most beautiful and complex of the beats. Its application is quite extensive. The presence of a sticker for the cue is of great importance here. Only a properly chalked, rounded, elastic and rough surface will allow the beating to be performed accurately.
4. Right side - a strike to the area exclusively to the right of the center mark of the cue ball. With such a strike, the cue ball acquires, in addition to a slow push forward, a rotational movement around a vertical axis passing through the center of the ball, counterclockwise, and, colliding with the ball being played, giving it a forward movement, spinning like a top and carried away by its oscillatory rotation, it will only move to the right .
5. Left side - strike into the zone strictly to the left side of the center of the cue ball. The effect of such an oscillation is similar to the previous one, only the beating comes out in a vertical rotation clockwise and after a collision with another ball it will move to the left.
The next four patterns of shots in billiards are recognized as particularly complex and are called combined pushes, since they simultaneously include components of side hits, as well as roll-up or pull-back.
6. Upper right side or roll to the right - hit a point to the right and up from the center of the cue ball. Such a push is made, if necessary, so that the ball, after passing through a collision with a directed ball, rolls to the right side and forward. The blow with the cue falls on the upper right area of the ball slowly and slowly. The resulting blow imparts three types of movement to the ball:
Forward forward;
Accelerating movement - roll;
There is some deviation, barely noticeable to the eye, to the right due to the lateral oscillation of the ball around the vertical axis.
7. Upper left side or roll to the left – a push to the area to the left and up from the center mark of the cue ball. The results of the given cue ball are similar to the previous one, only the ball moves to the left and forward.
9. Lower left side or pull to the left - strike to the area to the left and down from the center point of the ball. Allows you to “pull your” cue ball back and to the left when it comes into contact with the one being played.
Types of cue ball hits on an object ball
Taking into account the impact of the cue ball on the object ball, there are two subtypes of shots: straight and cut.
"Direct" blow
“Straight” balls are the arrangement of balls on the table when the cue ball and the target with the pocket are located on a straight line, bringing their center points together.
A particularly complicated push in a billiard competition is called a “straight” push, which is applied through the entire billiard table, “your” ball is distant from the target at an impressive distance.
Such a strike requires enormous precision.
"Cut" blow
“Cutting” is what players call playing balls that are outside the line that concentrates the striking centers and pockets. "Cutting" in many situations is better when the target area is visible. If the balls are placed at an angle of 90 degrees, then this position is considered “limit”.
Additionally, such shots have been developed when the object ball does not immediately go into the pocket, but bounces off the side, and then falls:
· doublet;
· cut doublet;
· croise (reverse stroke; the cue ball, after contact with the object ball, will cross the trajectory of its move towards the pocket)
Doublet
If artificial lines drawn mentally from the cue ball to the target ball and from it to the pocket form an isosceles triangle, the angle of incidence will be equal to the angle of reflection. The target ball is hit directly “head-on”, into the immediate core of the ball, and it falls into the pocket. Such a doublet is considered direct. It is recognized as the most lightweight doublet strike.
It is recommended to hit the double into the middle pocket smoothly. Under a given condition, even in the case of a not entirely accurate shot, the target ball, having hit the lip of the pocket, will bounce off it and collide with its other sponge. Then, after hesitating, he will fall. In the event of an extremely inaccurate hit, the ball, having come into contact with the sponge, will move away from the pocket to a certain distance and the stand will not come out.
Cut doublet
A cut doublet differs from a straight one, difficult blow. Here the target cannot be beaten head-on. The ball must be "cut". This action at a small angle of incidence significantly increases the display angle. With a cut doublet it is possible to place balls of maximum complexity.
Croise-reverse
If the ball is located at an excessively obtuse angle, so much so that it is impossible to play it with either a straight or cut doublet, then a doublet called a croisé, or, simply, a reverse one, is used.
A huge number of people love to play billiards. There are professionals, and there are just amateurs. Some play better, others a little worse, but everyone wants to learn some spectacular techniques that will surprise others and demonstrate the player's skill. There are many different techniques, the most striking of which is spinning the ball or, in billiard language, a screw. This technique looks very impressive, since the rotation of the ball itself is not very noticeable, but the movement of the ball on the billiard table caused by this rotation can be completely unexpected. Let's try to figure out how to make a shot to spin the ball around a horizontal axis, and what the effect of such a rotation will be.

The result of hitting the ball with a cue will depend on the location of the hit. The simplest strike is a strike to the center of the cue ball (the ball on which the cue is struck). Such a shot is called a “klapstoss” - a shot in which your ball (cue ball) remains in place after the central collision with the object ball. In this case, after being hit by the cue, the cue ball slides for some time on the billiard table cloth, and then rolls, rotating around a horizontal axis in the direction from the cue.

If the point of impact of the cue is shifted slightly upward from the center of the ball, you will get a “roll-up” - a blow in which the cue ball receives additional rotation in the direction of the ball’s movement. Since the line of action of the force from the cue does not pass through the center of mass of the ball, a torque arises. A similar situation will occur if the place of the cue impact is shifted slightly downward from the center of the ball, in this case you will get a “pull” - a blow in which the cue ball receives additional rotation in the direction opposite to the movement of the ball. In this case, a torque will also arise, but in the opposite direction.
When a cue ball hits an object ball centered on the cue ball's line of motion (center shot), the result of the collision will vary depending on the spin. When rolling up, after a collision, both balls will move in the direction of the initial movement of the cue ball. This is useful when the line connecting the centers of the cue ball and the object ball passes through the center of the pocket. In this case, with an accurate hit, both balls may end up in the pocket. When making a draw after a collision, the object ball will move in the direction of the original movement of the cue ball, and the cue ball will begin to move in the opposite direction. This is convenient when driving balls into central pockets. In this case, with an accurate hit, both balls can be scored into opposite pockets.
Let's look at the effect of the cue ball spinning when it hits the object ball off-center. The expansion of the balls, the same as without twisting, will be at an angle of 90 0. This follows from the laws of conservation of energy and momentum, as well as the Pythagorean theorem:


With a clap, the cue ball, after hitting the object ball, will move along a straight line, and when the ball is twisted, it will move along a curved path: when “rolling” it will deviate to the right, when “pulling” it will deviate to the left. The described effect can be used to pocket a ball with a complex arrangement of balls on pool table. However, it is necessary to take into account important point. When performing an off-center strike with a cue ball, the cue may jump off, resulting in a “kick” - an unsuccessful cue strike in which the cue sticker slips past the desired point of impact. In this case, the trajectory of the ball will be completely unpredictable until the cue ball jumps. In order to reduce the likelihood of “kicking”, it is necessary to carefully chalk the cue sticker, which will increase the friction force and prevent the cue from slipping.
Using the proposed method, we suggest that you practice performing a shot with the cue ball twisted and observe the movement of the balls as a result of such twisting.
Screw. Rolling and pulling
Each game has its own twist. There is such a twist in billiards.
The name of this highlight is screw. According to billiard terminology, screws are shots when the cue ball rotates to one degree or another like a top around its vertical axis. A screw is a pre-calculated hit off-center of the ball. Moreover, depending on which part of the ball it is applied to, it is called that way: in the upper part - the upper screw, or roll; in the lower part of the ball - the lower screw, or guy; to the right of the center of the ball is the right screw, to the left is the left screw. There are also screws combined proportionally and disproportionately: upper right, lower right, upper left, lower left. This proportion is determined by the player for each specific blow. We can talk endlessly about screws. In theory, this is the most uncalculated and most uncalculated part.

Sometimes it’s not just beginners who get confused with screws. You already know that with an accurate center shot into the board at a right angle without a screw (the cue is placed exactly in the center of the cue ball), the cue ball should return straight to you. When you shift the point of impact with the cue ball, the cue ball will not come from the board exactly towards you, but will pass to the right or to the left. Brief description It is very difficult to make all the screw effects, but it is even more difficult to use screws in practice. Screws are most often used to change the trajectory of the cue ball. What effect does one or another screw have on the trajectory of the ball during a horizontal impact and under what circumstances?
There are many of these circumstances:
As a result of the action of the cue itself;
Due to interaction with the coating (cloth);
Due to interaction with the side (with the sides), when the propeller can also acquire the meaning of forward and reverse;
As a result of interaction with another object ball(s);
Depending on the degree of distance from the center of the point of application of force, that is, on the force of the screw;
Depending on the strength of the blow itself;
Depending on the completeness of contact with another object ball, that is, on cutting;
In all possible combinations already specific game situation, where nothing can be arbitrary anymore.
Let's start from the beginning of the list. The initial cause of all troubles is the fact that each blow with a cue on the side surface of the ball deflects it in the opposite direction. The left screw is to the right, the right screw is to the left.
If the distance between the balls is large, then “your” ball will become subject to the effects of rotation and begin to turn in the direction in which the blow was made. The strength and quality of the blow, the degree of screw, and the quality of the coating are very important here. For horizontal impacts, these deviations will not be large, but they must also be taken into account when assessing each side impact. Now, trying to impart maximum rotation to “his” ball during a horizontal strike, the player can go in two ways: firstly, remove the point of application of force from the center of the ball, and secondly, accelerate the movement of the cue itself, that is, make a more rapid blow. But we must remember one rule - you can remove the point of application of force when screwing no more than 60% from the center. It is here that the critical limit of a controlled strike is reached; beyond this line the cue will overtake the ball upon impact.

It is often necessary for “your” ball (or cue ball, as you wish) to move forward after a hit. To do this, you need to hit the cue ball with a long, drawn-out blow to the top. This must be done smoothly and slowly, and the direction of the strike must be in a plane parallel to the billiards. There's another one little secret roll forward. With such a blow, it is important not only to hit the top of the ball, but also to lower your right hand a little so that the blow goes slightly upward from the bottom. Then the cue ball, moving forward, will also spin from top to bottom, and when it hits the object ball, it will only transfer its forward motion to the latter, and after the hit it will continue to move forward. Such a blow, as you already understood, is called “rolling up”. Rolling up is the most common and easy blow. All beginners start playing only by coasting. Moreover, when charging, the most accurate thing is to aim and strike. In the “combined pyramid” (“American”) this is generally the most common blow. As a rule, it is done so that after the blow is realized, the “brother-in-law” will roll up to the pocket. This is how the player makes a “way out” for the next shot. Often, professional players finish the game by pocketing all 8 balls, using exclusively the reel.

In order for the cue ball to move back after hitting the object ball, it needs to be given two types of movement: one translational, and the other rotational, from bottom to top, that is, give it reverse rotation. In this case, you must hit the bottom of the ball, and your right hand must be kept strictly parallel to the plane of the playing surface. Occasionally, players raise their right hand, as if making a slightly downward strike. As in the previous case, after the hit the cue ball will transfer forward motion to the object ball, but it will not roll forward, but after standing still for a second or two, it will move backward. This blow is called a "draw". This is perhaps the most beautiful, but also the most difficult blow. Many very skillful blows are unthinkable without a quickdraw, and its application is very extensive.

When making a draw, the player needs to concentrate on accurately fulfilling the conditions of this blow, and most importantly, on its complete completion until the moment you begin to rise above the table, wanting to give way to your ball. Concentrate on the blow, because the ball will not come running back “at the behest of the pike.” Don't expect great results right away either.
So, when hitting the cue in a plane almost parallel to the plane of the billiards, do not swing the cue too much. When pulling, the most important thing is the instantaneity and softness of the blow, not force. Oddly enough, even if you need to pull back strongly, it is not necessary or even necessary to hit powerfully. Moreover, the sticker is of great importance here. Elastic to a certain extent, and rough is best.
If you want to make a very steep draw and if the cue ball and the object ball are very close, then you need to hit the cue down at an angle of 45° (we talked about the need for such shots a little higher). Sometimes the need for a top-down shot appears when the ball is almost at the edge and there is no way to place the cue parallel to the table. This short and quick blow is extremely difficult, and its use will immediately reveal a prepared player. In terms of difficulty, this blow can be compared to a klapstoss across the entire table. The more specific game requirements you put into your shot, the more control over your shot technique will be required during execution.
This text is an introductory fragment. From the book Learn to Play Table Tennis author Barchukova Galina VasilievnaROLLING The rolling technique appeared much later than cutting. The ability to perform this technique arose with the invention of rackets with sponge and rubber pads. The ball is rolled in, “stroked” with a racket from bottom to top and forward. That's probably why this one
From the book Great Soviet Encyclopedia (AR) by the author TSB From the book Great Soviet Encyclopedia (VI) by the author TSBScrew Screw (from German Gewinde - cutting, thread, in Polish, gwint), a machine part that is cylindrical, less often conical, shaped with a helical surface or a part with helical blades. There are groups of V.: those directly interacting with the external, or working, environment and
From the book Great Soviet Encyclopedia (VO) by the author TSB From the book Great Soviet Encyclopedia (GR) by the author TSB From the book Alternative Culture. Encyclopedia author Desyateryk DmitryVint VINT is a unifying name for a group of drugs (pervetin, jef, mulka, white) based on the alkaloid ephedrine. They are created through a series of operations with the cold medicine containing ephedrine, solutan. V. in its effect is active, stimulating,
From the book I Explore the World. Aviation and aeronautics author Zigunenko Stanislav NikolaevichA propeller instead of a wing? This meeting, like a drop of water, reflected the changes that were brewing in society. Of course, Jules Verne could not help but reflect them in his books. The scene he saw in the hall in the novel “Robur the Conqueror” turned into an episode of the battle of the heavy “Albatross”
From the book Russian Billiards. Large illustrated encyclopedia author Zhilin LeonidA propeller instead of a wing. Airplane or rotorcraft? Being carried away by the achievements of aviation, you and I somehow completely lost sight of the fact that in addition to airplanes, there are other types of aircraft in it. The ability of a rotating propeller to rise into the air, as we have already said, was known
From the book Great Encyclopedia of Technology author Team of authorsScrew with Cutting Now that we know what we need to know about cutting, we should continue talking about screws. If you shift the blow from the axis of the direct impact on “your” ball by only half its diameter, then when it rebounds it will move from the straight line to the right or left of its natural
From the book 150 situations on the road that every driver should be able to solve author Kolisnichenko Denis NikolaevichArchimedes screw An Archimedes screw is most often defined as an Archimedes worm, used in worm gears of various mechanisms. Archimedes screw. The Archimedes screw, or worm, is made according to the principle of the Archimedean spiral - the trajectory of a point moving uniformly along
From the author's bookScrew A screw is a metal rod, mostly threaded, but in some cases screws are made of durable plastic using special dies. These screws are used to connect small wooden or plastic parts. Metal screws
From the author's bookTip No. 116 In winter, before an intersection, you need to start braking in advance, since there may be ice or snow in front of it. If you do not follow this advice, you risk driving into the intersection, and this does not bode well.
Billiards is a seemingly simple and understandable game that requires only accuracy and basic knowledge of geometry. In fact, in the arsenal professional players There are a number of interesting shots, ways to handle the ball and create a game strategy. One of them is the so-called “screw”. With its help, you can change not only the trajectory of the cue ball, but also the behavior of someone else’s ball, perform complex tasks, roleplaying, tactical actions.
If it is relatively simple, then not everyone knows how to spin a ball in billiards. Professionals, when conducting serious competitions, use such techniques only when necessary; performing a screw requires a lot of practice.
What is a "screw" in billiards
Screw is the conventional name for the rotation of the cue ball around its own axis after a hit. In addition to translational motion, it also acquires rotational motion, which subsequently affects its behavior after contact with another ball.
To perform such a shot, you need to move the aiming point from the center of the cue ball. Main aiming points on the cue ball:
- the center of the ball (a blow called "klapstoss")
- a point shifted strictly upward (rolling strike);
- displacement of the point straight down (strike with a pull);
- shifting the aiming point strictly to the right or left (strike with a right or left screw).
So, to give the ball a screw, you need to move the aiming point on the cue ball to the side. You can also give the ball an upper right screw (displacement of the point to the right and up), a lower right screw, an upper left screw and a lower screw.
Performing a blow with a screw
The billiard ball has the regular shape of a sphere. When you move your aiming point to the side, the shot on the cue ball seems to be sliding. To complete it successfully, follow these rules:
- chalk the cue sticker very well so that it does not come off during impact;
- carry out the blow itself smoothly, softly, without unnecessary effort;
- do not forget to maintain your line of sight: only the point of impact on your ball moves, but the point on someone else’s ball where you must hit remains in place.
Training of various twisting blows
You can perform kicks with rotation even when you have a well-positioned stance; straight and simple punches go well and without failures. First, practice hitting without someone else's ball. Place the cue ball on the center line. Alternately give it the right and left screw, watch how the ball’s rebound from the board changes. Then try using the screw in the game. Perform a shot that you are good at without a screw. Without changing the initial position of the two balls, perform the same shot, but with a screw, watch the behavior of the cue ball. It is important that someone else's ball falls into the pocket, as with a normal shot - this will be a test for you.
Train screw strikes yourself, try to use them in game practice. You don’t need to get too carried away with twisting punches, but you should definitely hone your skills.


 Card index of games on life safety in the senior group")
